Minting own cryptocurrency
Understanding the process of crypto minting and monetizing the token on the market.
- 20 min read

The year 2024 marked another thrilling crypto bull run, capturing widespread mainstream attention. In this blog, we’ll take you through the entire process of minting your own cryptocurrency on the Solana blockchain, listing it on a crypto exchange to monetize your efforts, and exploring how bad actors could exploit these same steps to commit fraud.
Disclaimer: This blog is for educational purposes only. Be mindful of the legal and tax implications of any actions you take based on this guide.
Crypto frauds come in all shapes and sizes, ranging from simple scams to highly sophisticated schemes. Here, we focus on empowering everyday users with knowledge while avoiding an overload of technical jargon.
For those eager to dive deeper, you’ll find additional learning resources throughout the blog, marked with a Self-study tag. These are optional but highly valuable for expanding your understanding of the topic. If you’re short on time, feel free to skip them — you’ll still grasp the essential points covered in this article.
Cryptocurrency
Understanding cryptocurrency and its building blocks
Cryptocurrency is a universally agreed-upon and accepted form of digital value. Unlike physical assets like gold or cash, cryptocurrency exists entirely in the virtual realm, represented as a piece of cryptographically secured data. This data is stored in a specialized structure called a blockchain — a decentralized, tamper-resistant ledger that ensures transparency and security.
Self-study: What is crypto and blockchain?
Cryptocurrency is brought into existence through a process known as “mining.” Similar to physical gold mining, where effort leads to rewards, crypto mining requires computational work, consuming electricity to solve complex cryptographic puzzles. This process forms the basis of the Proof of Work (PoW) consensus mechanism. However, alternative mechanisms exist, such as Proof of Stake (PoS), which relies on staking existing assets and uses the term “minting” instead of “mining”.
Self-study: Proof of Work vs. Proof of Stake
Cryptocurrency can be broadly categorized into “coins” and “tokens.” Both function as representations of value, usable for payments or as digital stores of wealth.
- A coin is native to its blockchain, such as Bitcoin (BTC) for the Bitcoin blockchain, Ether (ETH) for Ethereum, or Solana (SOL) for the Solana blockchain.
- A token is built on top of an existing blockchain. Tokens can be fungible (like stablecoins or altcoins) or non-fungible (NFTs). Blockchains like Ethereum and Solana natively support tokens, while Bitcoin accommodates tokens through more complex methods. The process of creating tokens is known as “minting”.
Self-study: Coin vs. Token
In this blog, we will create a token on the Solana blockchain and the token will be publicly traded.
Solana blockchain
The Solana blockchain has gained immense popularity, with its native token, SOL, consistently ranking among the top 10 cryptocurrencies by market capitalization. What sets Solana apart from Bitcoin is its innovative consensus mechanism and distinct focus.
Unlike Bitcoin, which relies on Proof of Work (PoW) to secure its network, Solana employs a highly efficient Proof of History (PoH) mechanism, integrated with Proof of Stake (PoS). This combination ensures faster transaction processing and lower fees, making it an attractive platform for developers and users alike.
Solana’s primary strength lies in its ability to simplify the creation and deployment of fungible tokens (like stablecoins) and non-fungible tokens (NFTs). Additionally, it facilitates seamless cross-chain bridging, enabling interoperability with other blockchain networks — an essential feature in today’s interconnected crypto ecosystem.
Self-study: Bitcoin vs. Solana
For this blog’s purposes, it’s enough to understand that Solana operates with Addresses and Accounts. Tokens are transferred between Addresses and “physically” stored within Accounts. Interestingly, an Address can exist without an associated Account when performing specific actions, like token minting.
Solana employs an account-based model, where a Solana Account keeps track of token balances, updating them via debits and credits. This contrasts sharply with Bitcoin’s UTXO (Unspent Transaction Output) model. In Bitcoin, there’s no centralized account; instead, the blockchain tracks and stores the outputs of every transaction individually within the ledger.
Self-study: Account-based model vs. UTXO model
Each Solana Address is derived from a cryptographic keypair. The public key in the keypair serves as the Address itself, used for sending and receiving tokens. The private key is critical for signing and authorizing transactions, ensuring only the owner of the Address can initiate changes or access funds.
Let’s mint our tokens
Every operation on a blockchain, including minting your own token, incurs a cost. On the Solana blockchain, these costs are minimal, requiring only a small fraction of SOL. However, most blockchains provide a testnet environment where users can experiment without real financial risks, mirroring the functionality of the production mainnet.
Solana goes a step further by offering both a testnet and a devnet. For this guide, we’ll use the devnet.
Self-study: Solana testnet and devnet
Minting consists of the following steps:
- Prepare a local environment to interact with Solana blockchain via CLI
- Create minter’s Address - recognized also as Mint Authority
- Create the token Address, token Account and the token itself
- Associate metadata to the token
- Mint the token
- Transact
- Improve the reputation of the token
- Go to the market and monetize
1. Prepare a local environment
Install Rust and Solana CLI on your machine. Alternatively you can execute the whole process from within the Docker container built for this purpose.
I re-used the following Dockerfile:
# Use a lightweight base image
FROM debian:bullseye-slim

# Set non-interactive frontend for apt
ENV DEBIAN_FRONTEND=noninteractive

# Install required dependencies and Rust
RUN apt-get update && apt-get install -y \
    curl build-essential libssl-dev pkg-config nano \
    && curl --proto '=https' --tlsv1.2 -sSf https://sh.rustup.rs | sh -s -- -y \
    && apt-get clean && rm -rf /var/lib/apt/lists/*

# Add Rust to PATH
ENV PATH="/root/.cargo/bin:$PATH"

# Verify Rust installation
RUN rustc --version

# Install Solana CLI
RUN curl -sSfL https://release.anza.xyz/stable/install | sh \
    && echo 'export PATH="$HOME/.local/share/solana/install/active_release/bin:$PATH"' >> ~/.bashrc

# Add Solana CLI to PATH
ENV PATH="/root/.local/share/solana/install/active_release/bin:$PATH"

# Verify Solana CLI installation
RUN solana --version

# Set up Solana config for Devnet
RUN solana config set -ud

# Set working directory
WORKDIR /solana-token

# Default command to run a shell
CMD ["/bin/bash"]
After building the image by docker build -t solana . all my further steps were executed from the container CLI:
> docker run -it --rm --mount type=bind,src=./volume,dst=/solana-token solana
Do not forget to create a Docker volume or mount the local folder to persist the data. During the process you will generate Solana keypairs which are necessary for further interaction with the blockchain and we need to store them permanently.
2. Create minter’s Address
Minting is executed as a transaction on the blockchain, and like all transactions, it must be signed and authorized. To do this, we require a special keypair.
Reminder: An Address is generated from a keypair. While an Account (also referred to as a “Wallet”) can store funds received at an Address, we don’t need an Account at this stage of the process.
Create a keypair prefixed by aa for our easier identification on blockchain and during the next steps:
> solana-keygen grind --starts-with aa:1

Searching with 8 threads for:
        1 pubkey that starts with 'aa' and ends with ''
Wrote keypair to aamebEXztWv5VjC6KeBWHbpb62X2uE3XtqaqMfY8D7X.json
This step produces a JSON file with a keypair. The string aamebEXztWv5VjC6KeBWHbpb62X2uE3XtqaqMfY8D7X represents the Address and is at the same the public key. The Address identifies also the Mint Authority later on.
solana-keygen command has more options and you can define preferred starting and trailing Address characters, prevent the JSON file creation and generate passphrase instead. You can even select the language for your passphrase:
> solana-keygen grind --starts-and-ends-with A:M:1 --ignore-case --use-mnemonic --word-count 24 --language japanese --no-outfile --no-bip39-passphrase

Searching with 8 threads for:
	1 pubkey that starts with 'a' and ends with 'm'
==========================================================================================================================================================================================================================================================================================================================
Found matching key Ad6iPYyWaVDTpS9CCQZJzoBd4mcBqtXit15WpYZ7aPDM

Save this seed phrase to recover your new keypair:
こもん じてん ようす げどく のりもの てくび うけとる れいせい たんめい もうどうけん いもたれ せりふ くねくね りけん もらう しらせる いんしょう あらためる おうさま りそう いせかい ぶんぐ だんねつ りろん
==========================================================================================================================================================================================================================================================================================================================
Commands solana config set --keypair xyz.json, solana config set --url devnet and solana config get will become very useful when starting experimenting and switching between devnet and mainnet. Setting the right “config” ensures we are using the right blockchain and the right identity.
For now, we want to stay in devnet:
> solana config set --url devnet

Config File: /root/.config/solana/cli/config.yml
RPC URL: https://api.devnet.solana.com
WebSocket URL: wss://api.devnet.solana.com/ (computed)
Keypair Path: aamebEXztWv5VjC6KeBWHbpb62X2uE3XtqaqMfY8D7X.json
Commitment: confirmed
Now we have minter’s Address in place which will act as Mint Authority. The address has zero balance now:
> solana balance
0 SOL
Accounts are created also implicitely when the Address receives initial funds.
Minting and transacting on the Solana blockchain require spending some fractions of SOL token. In the mainnet we would need real SOLs and fund aamebEXztWv5VjC6KeBWHbpb62X2uE3XtqaqMfY8D7X Address in advance.
Devnet allows as free generation of fake SOLs via https://faucet.solana.com/. These SOL tokens can be used for minting, transactions, and testing all functionalities without spending real SOL. 1 SOL is sufficient for all remaining steps from this guide.
Generate fake SOLs and now Mint Authority has funds for the further steps:
> solana balance
1 SOL
Mint Authority Address is available on mainnet as well, however Address has still a zero balance:
> solana config set --url mainnet-beta

> solana balance
0 SOL
Switch back to devnet and let’s continue:
> solana config set --url devnet
3. Create the Address for the token, token Account and the token itself
Minted tokens must have a dedicated Address and also corresponding Account.
Let’s create both.
> solana-keygen grind --starts-with mm:1

Searching with 8 threads for:
        1 pubkey that starts with 'mm' and ends with ''
Wrote keypair to mmA7XRTuehAmivkWuz554YUTNQpX7STHgWbJj6ZDcnA.json

> spl-token create-account mmA7XRTuehAmivkWuz554YUTNQpX7STHgWbJj6ZDcnA

Creating account DxAmvwfPQRJe9C2jvvgtjvwqzRe9m9AuATtXA6XfH9zr
Now create the token itself:
> spl-token create-token \
--program-id TokenzQdBNbLqP5VEhdkAS6EPFLC1PHnBqCXEpPxuEb \
--enable-metadata \
--decimals 9 \
mmA7XRTuehAmivkWuz554YUTNQpX7STHgWbJj6ZDcnA.json

Creating token mmA7XRTuehAmivkWuz554YUTNQpX7STHgWbJj6ZDcnA under program TokenzQdBNbLqP5VEhdkAS6EPFLC1PHnBqCXEpPxuEb
To initialize metadata inside the mint, please run `spl-token initialize-metadata mmA7XRTuehAmivkWuz554YUTNQpX7STHgWbJj6ZDcnA <YOUR_TOKEN_NAME> <YOUR_TOKEN_SYMBOL> <YOUR_TOKEN_URI>`, and sign with the mint authority.

Address:  mmA7XRTuehAmivkWuz554YUTNQpX7STHgWbJj6ZDcnA
Decimals:  9
Token creation on Solana is governed by a built-in “Program” that defines how fungible and non-fungible tokens are implemented. The SPL Token Program is a smart contract, a core part of Solana’s infrastructure, maintained and audited by the community, which reduces risks compared to deploying custom contracts.
While it’s possible to create custom smart contracts on Solana to tailor token behavior—such as automating token distribution or integrating with external applications — this also opens the door for malicious actors. Fraudsters can deploy their own contracts with harmful features, such as preventing token resale, imposing excessive transaction fees, freezing specific addresses from transacting, or enabling unlimited token minting capabilities.
Self-study: Solana Token Program.
4. Associate metadata to the token for better reputation
At this point, we have an anonymous token with no name or logo. To make it more identifiable, we can attach metadata to the token. This metadata can include the token’s name, description, and an icon that will be displayed in the Solana Explorer and across all markets and crypto exchanges where the token is listed.
Our token will be called Krypton.
Create the token icon and upload the icon into the publicly available location, e.g. GitHub or IPFS. Afterwards refer to the image in the metadata JSON file as follows:
{
  "name": "Krypton Coin",
  "symbol": "KRYPTON",
  "description": "Noble crypto gas",
  "image": "https://TOKEN-ICON-LOCATION.png"
}
Store the metadata JSON again to publicly reachable location.
In my case it is https://teal-glad-wren-997.mypinata.cloud/ipfs/bafkreihuky2npbxicpdxj5qtxhjuemgeb4jwxhrkiwyrsvz3wcxnkz4yqm
Once metadate JSON file is publicly reachable, link it to the token:
> spl-token initialize-metadata \
mmA7XRTuehAmivkWuz554YUTNQpX7STHgWbJj6ZDcnA \
"Krypton Coin" \
"KRYPTON" \
https://teal-glad-wren-997.mypinata.cloud/ipfs/bafkreihuky2npbxicpdxj5qtxhjuemgeb4jwxhrkiwyrsvz3wcxnkz4yqm
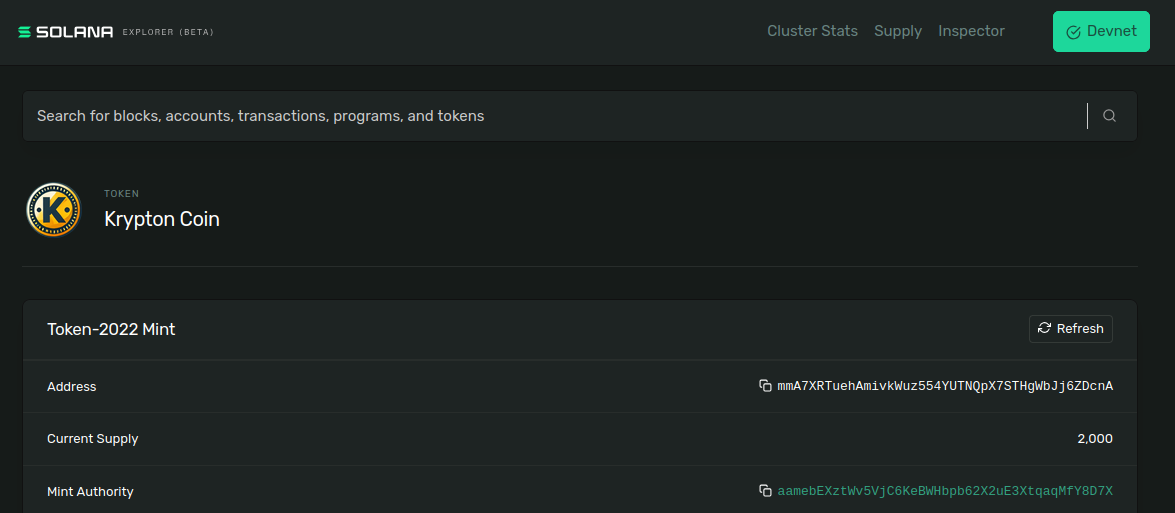
As a result, Solana Explorer shows Krypton coin’s icon and related details.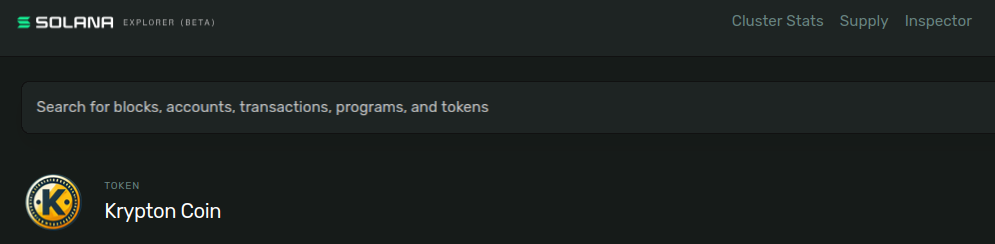
5. Mint the token
We have defined the token Address, token Account, token definition itself and associated metadata to the token.
We are ready to mint!
Let’s mint 2000 Kryptons:
> spl-token mint mmA7XRTuehAmivkWuz554YUTNQpX7STHgWbJj6ZDcnA 2000

Minting 2000 tokens
  Token: mmA7XRTuehAmivkWuz554YUTNQpX7STHgWbJj6ZDcnA
  Recipient: DxAmvwfPQRJe9C2jvvgtjvwqzRe9m9AuATtXA6XfH9zr
You can repeat this step as many times as needed and mint further tokens - similarly to what governments do ;).
6. Transact
Tokens are stored in the token Account, and the Mint Authority is responsible for authorizing transactions involving these tokens.
Let’s assume there is another Address 92PjKtt6y5qufxZVdAKHU5huj8CDuMpj9Pfy9SfQg9eL created by CLI using solana-keygen grind... or directly in Crypto wallet on your laptop or cell phone.
While still authenticated as Mint Authority…
> solana config get

Config File: /root/.config/solana/cli/config.yml
RPC URL: https://api.devnet.solana.com
WebSocket URL: wss://api.devnet.solana.com/ (computed)
Keypair Path: aamebEXztWv5VjC6KeBWHbpb62X2uE3XtqaqMfY8D7X.json
Commitment: confirmed
…transfer 10 Kryptons to 92PjKtt6y5qufxZVdAKHU5huj8CDuMpj9Pfy9SfQg9eL
> spl-token transfer mmA7XRTuehAmivkWuz554YUTNQpX7STHgWbJj6ZDcnA 10 92PjKtt6y5qufxZVdAKHU5huj8CDuMpj9Pfy9SfQg9eL --fund-recipient --allow-unfunded-recipient
All tokens were received to 92PjKtt6y5qufxZVdAKHU5huj8CDuMpj9Pfy9SfQg9eL Address during the time are stored on Solana blockchain.
Let’s summarise:
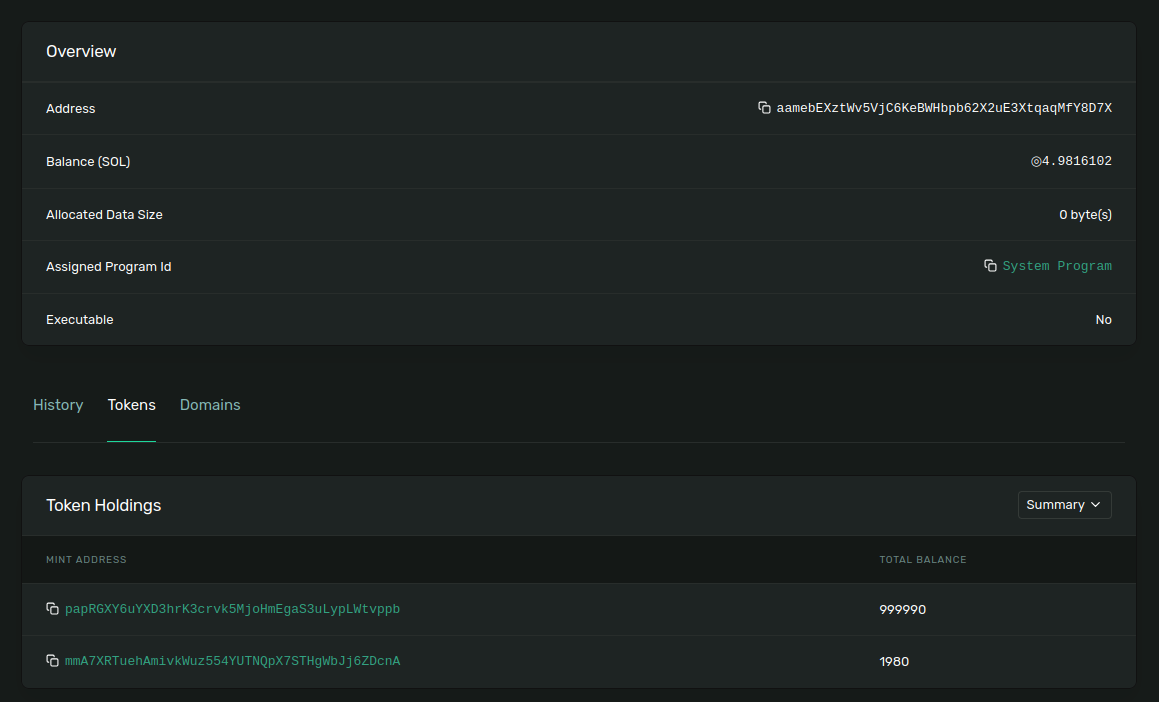
The Mint Authority aamebEXztWv5VjC6KeBWHbpb62X2uE3XtqaqMfY8D7X minted 2000 Kryptons on the Solana devnet. Tokens were minted to the Address mmA7XRTuehAmivkWuz554YUTNQpX7STHgWbJj6ZDcnA as shown in the Solana Explorer for token Address.
Mint Authority is eligible to spend minted tokens. In the screenshot from Solana Explorer for Mint Authority below, our Minting Autority minted 2 separate tokens and already spent (transfered) some of of the tokens:
mmA7XRTuehAmivkWuz554YUTNQpX7STHgWbJj6ZDcnA(Krypton Coin, original supply 2000)papRGXY6uYXD3hrK3crvk5MjoHmEgaS3uLypLWtvppb(Papuga Coin, original supply 1000000)
7. Improve the reputation of the token
By default, any newly created token has a poor reputation. The reputation can be checked on RugCheck.
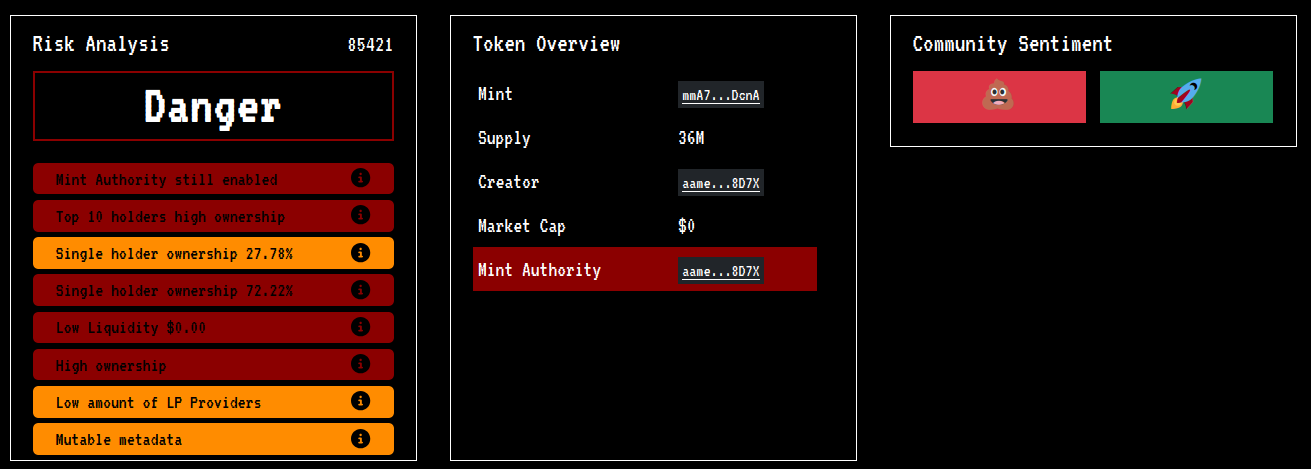
Remember the term “rug”, as we’ll revisit it later when discussing rug pull scams.
To help harden the token and improve its reputation, we can take a few initial steps:
- Distribute the token supply to a wider range of Addresses (wallets) to ensure the assets aren’t concentrated in just a few hands.
- Irreversibly disable further token minting by running the command:
> spl-token authorize mmA7XRTuehAmivkWuz554YUTNQpX7STHgWbJj6ZDcnA mint --disable
Executing these steps will reduce some of the warnings displayed on RugCheck.
8. Go to the market and monetize
Remember that all steps above have been executed on the Solana devnet.
To start trading, we need a “real” Krypton token on the Solana mainnet.
Moving to the Solana mainnet is very easy. We just need to switch to the mainnet:
> solana config set --url mainnet-beta
We can reuse the existing Mint Authority Address to send real SOL for minting tokens. A small amount, around 0.03 SOL, is enough to mint the tokens and perform multiple test transactions.
The token address can also be reused. Simply create the token (spl-token create-token...), initialize its metadata, and you’re ready to start minting. On the devnet, we minted 2000 tokens, while on the mainnet, we minted 36 million tokens. Remember, you can continue minting tokens indefinitely unless, as the minting authority, you disable this option.
Now, we have a token on the production Solana mainnet, and we can transact with others. We can send the token, and recipients can send it further.
But wait — what about the “price” of the token compared to others or cryptocurrencies? Let’s dive into the world of token exchanges.
Monetizing the token
The market price of any asset is determined by the interplay of supply and demand. At present, we only have the supply side: 36 million Kryptons. However, there’s no established market or true price yet, meaning tokens can be exchanged at any value—or even given away for free — without requiring a counter-value.
We have the power to create our own market, and there are multiple ways to do so. BThe next section describes is just a snapshot of the possibilities. There are countless strategies and variations we can explore to monetize and market our tokens.
Crypto markets
1. Own market and direct sale
The price of Kryptons can be fixed against any chosen asset, such as USD, or dynamically adjusted based on current demand — much like the frenzied tactics of Wall Street brokers. This method depends on having enough “market makers” — people willing to not only buy Kryptons but also provide an environment where they can be resold at any time.
Challenge: Maintaining sufficient market makers (users placing buy and sell orders) to prevent an illiquid market.
2. Initial Coin Offering (ICO) and Launchpads
Just like an IPO (Initial Public Offering) for stocks, crypto tokens can be sold to the public through an ICO (Initial Coin Offering). This method is popular among startup projects as it helps build a community of token holders while raising funds for the project. ICOs are often supported by Launchpads, which serve as token sale platforms and conduct due diligence to protect buyers.
Challenge: An ICO demands substantial effort, marketing, and additional costs. Moreover, it sometimes carries the risk of being perceived as fraudulent activity.
Self-study: ICO
3. Airdrops and community-driven approach
The mint authority can freely distribute small amounts of tokens as “airdrops” to a broad audience, helping to establish a large community of potential users. Projects can further incentivize users to claim or earn airdrops by engaging with the project in specific ways.
Challenge: The distributed value is spread thin, with no strong assurance of future trading activity or that token holders will engage with exchanges. Many tokens risk becoming dormant.
Self-study: Airdrops
4. Listing on centralized crypto exchange (CEX)
Major crypto exchanges like Binance, Kraken, and Coinbase offer a wide array of token pairs for buying and selling. However, enabling such trades requires navigating a complex legal and regulatory process.
Challenge: The listing process can be expensive and time-consuming.
Self-study: Listing the token at CEX
5. Liquidity pools and Automated Market Makers (AMM)
THIS will be our choice and Liquidity pools will be explored in the next chapter.
Liquidity pools
Selling tokens directly doesn’t guarantee that the seller will buy them back, which can make the token less appealing for trading. This is where liquidity pools come in. A liquidity pool is a mechanism that ensures tokens can always be bought or sold — within the limits of the pool itself.
Naturally, you can’t buy more tokens than the pool holds. However, you can always extend the pool — think of it like pouring more water into a swimming pool.
How do we make sure trades are always possible? The key lies in “pouring” both the token and its trading pair into the pool. For example, if you want to create a market for the Krypton/SOL trading pair, you’ll need to supply a certain amount of Kryptons (which are free to mint and can be created as needed) alongside some trusted and liquid SOL tokens.
Platforms like Raydium enable you to create your own liquidity pools or contribute liquidity (trading pair of your choice) to existing pools and earn fees in return.
In my case, I decided to set up a liquidity pool for the Krypton/SOL pair, investing 8 million Kryptons and 0.5 SOL. The amount of SOL I chose to invest while establishing the pool determines the initial exchange rate.
Let’s break it down with some math.
8 000 000 Krypton = 0.5 SOL
Krypton / SOL = 0.5 / 8 000 000 = 0.000000063
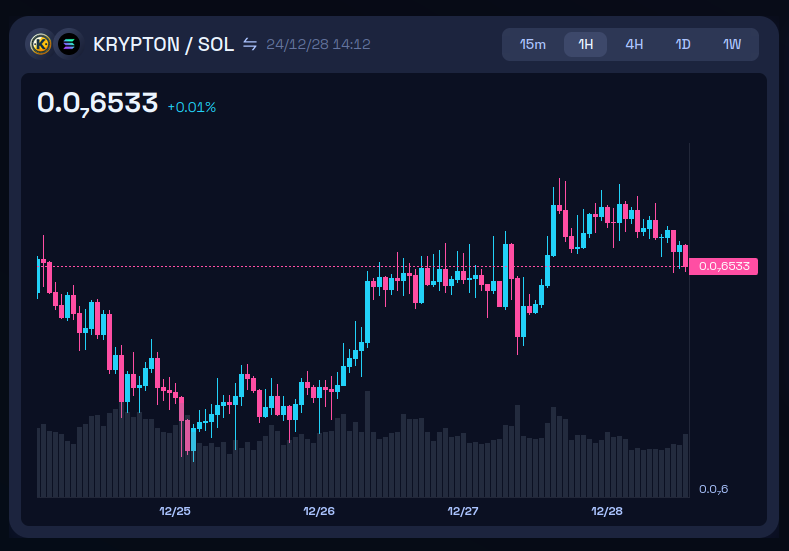
Once the pool is created and funded with Kryptons and SOL tokens, Raydium will declare the initial exchange rate for the Krypton/SOL pair. For example, with my investment, the starting exchange rate is 0.000000063. If I had invested more SOL, the initial exchange rate would have been higher.
After establishing the Krypton/SOL liquidity pool, our token becomes publicly visible and tradable on platforms like Dex Screener.
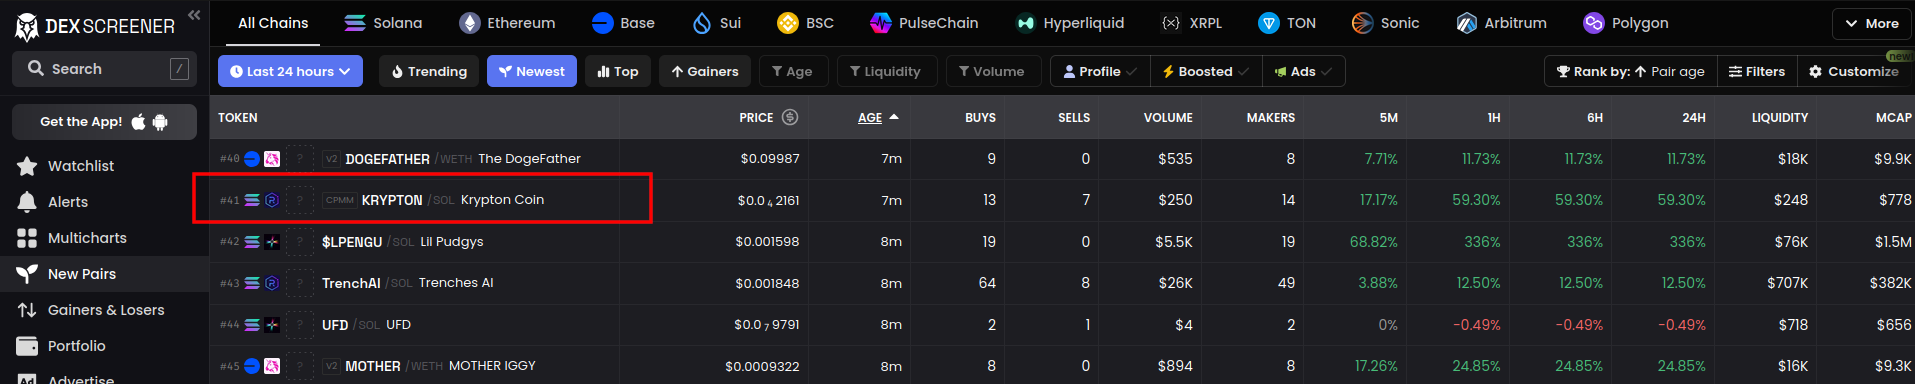
To start trading, potential traders need to connect their crypto wallets with some SOL tokens to Raydium and swap SOL for Krypton.
The Krypton/SOL liquidity pool initially contains a fixed number of Kryptons (8,000,000) and SOLs (0.5). When someone buys Kryptons, the pool dynamics shift: Kryptons are removed from the pool, and additional SOL tokens are added, as illustrated in the following example.
After the token was introduced to the market, traders purchased several million Kryptons, leaving only 5.7 million Kryptons in the pool. As a result, the pool now holds 0.69 SOL — an increase of 0.19 SOL compared to my initial investment.
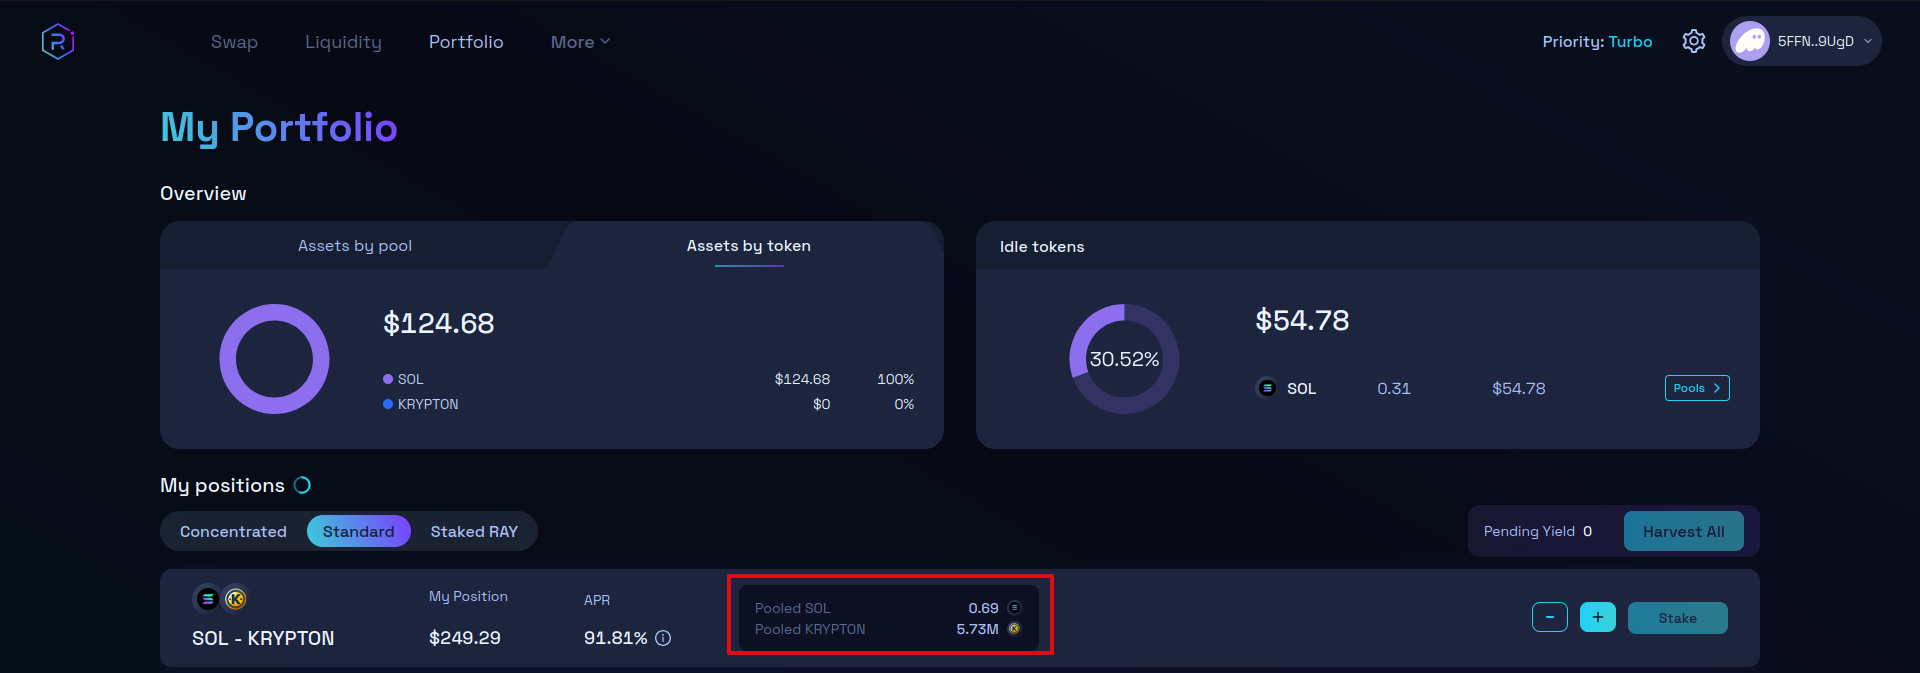
The new ratio of Kryptons and SOLs establishes a new exchange rate and, consequently, a new token price.
Especially during the initial token placement on the market, bots and traders can introduce significant volatility. As Kryptons are bought up, the pool may become depleted, while more SOLs are added. This makes Kryptons scarcer, driving the price up.
Frauds
WARNING: The section below is for educational purposes only and tries to explain anatomy of the crypto frauds.
Crypto fraudsters can use two simple methods to siphon SOLs from a liquidity pool. Keep in mind that Solana (SOL) is a publicly trusted cryptocurrency, listed on all major exchanges, and can easily be swapped for USD or EUR.
Fraudsters often wait until a significant amount of SOLs accumulate in the liquidity pool before attempting to drain them. This accumulation can be artificially boosted through fraudulent marketing campaigns.
Fraud #1
As the minting authority, the fraudster has the ability to mint new Kryptons or may have set aside a few million Kryptons for themselves. Nothing prevents them from buying out all the SOLs in the pool and later converting them into fiat currency (USD or EUR).
Fraud #2
The fraudster, who is also the liquidity pool creator, can remove the liquidity pool entirely and retrieve its contents — meaning they can extract the more valuable SOLs while leaving behind the now - worthless Kryptons. When a liquidity pool is created on Raydium, the pool owner is issued special LP (Liquidity Provider) tokens. These LP tokens can be “burned” in a special blockchain process, which makes the pool permanent and increases trust. However, the fraudster would likely avoid burning the LP tokens, keeping backdoors open for manipulation.
Fraud #N
Frauds can become more complex when custom smart contracts are used to implement token minting. While I’ve used the native Solana “Program,” which is audited and transparent, it still leaves room for fraudulent activity. By using a custom smart contract, a fraudster gains more control over token supply, token transactions, or even the ability to directly steal tokens.
These types of scams are commonly referred to as “rug pulls” in the crypto world, where the fraudster suddenly withdraws the valuable tokens, leaving investors with nothing.
Self-study: Rug Pull crypto scam
Final thoughts
Liquidity pools are a legitimate and powerful mechanism for bringing tokens to life and providing a space for investors to trade. However, as a trader, always exercise caution—verify the credibility of the token before diving in.
At its core, minting tokens is a process controlled by a smart contract, which dictates how and when new tokens are created. While this process is meant to be automated and secure, if not properly designed, audited, or secured, it can become a loophole for fraud.
Much like the intentions of bad actors, token programs, dApps, and underlying smart contracts are ultimately just lines of code. These codes can be vulnerable or, in the worst cases, maliciously crafted to deceive and defraud unsuspecting users.
Fraud in the crypto world is vast and can take many forms, far beyond what we’ve covered in this article. But to help protect yourself, keep an eye out for these red flags:
- Unclear or Anonymous Team: If you can’t find reliable information about the project’s creators, it’s a red flag. Lack of transparency is often a tactic to hide bad intentions.
- Promises of Guaranteed Returns: If it sounds too good to be true, it probably is. Promises of high, risk-free returns are often used to lure in unsuspecting investors.
- Unverified or Audited Smart Contracts: Always check if the smart contract has been audited by a reputable third party. An unaudited contract may have vulnerabilities that can be exploited.
- Fake or Misleading Tokenomics: Watch for token models that don’t make sense or seem too complicated to understand. If the distribution mechanism looks suspicious, it’s worth investigating further.
- Illiquid Market with No Trading Volume: If a token is listed on exchanges but lacks real trading volume or liquidity, it could be a sign that it’s a scam or a “pump-and-dump” scheme.
- Unnecessary Complexity: If the project is overly complicated or unclear about how it works, it could be hiding something. Legitimate projects are usually clear and easy to understand.
- “Rug Pull” Potential: If the contract allows the creators to withdraw liquidity at will or gives them too much control over the token, it increases the risk of a rug pull—where they drain the liquidity and disappear.
Stay vigilant, always do your own research, and protect your investments. The crypto world can be a rewarding space, but it’s also full of risks, and you need to be prepared for the potential threats out there.
Fun fact
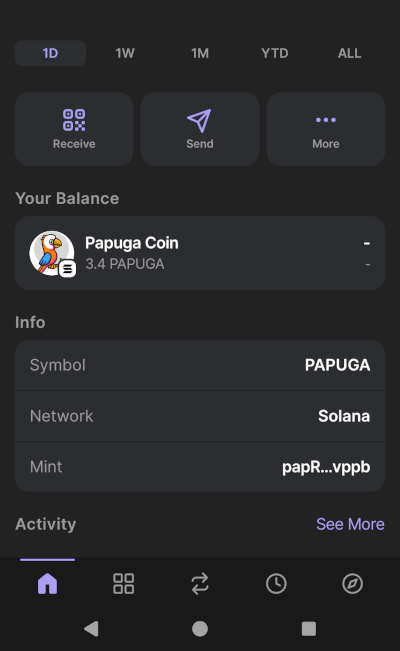
In addition to education, our family began using a custom Papuga Coin to reward the kids for completing household tasks. My children have installed the Phantom crypto wallet on their phones and earn Papugas throughout the month for helping out around the house or assisting each other.
Daddy serves as the centralized exchange, converting Papugas into fiat currency (EUR) at the end of each month.
All transactions are stored on the blockchain: https://explorer.solana.com/tx/2Rpp9rEa5g1dVmnqRkBn9Y7RkjMdBJzt2oF9o9eLErV8ARPiL47HojLNBxt2NRYovpGoskUupyiEP3For8qF89Mp?cluster=devnet
All transactions take place on the Solana devnet and incur no fees. If you’d like a few thousand Papugas for free, just let the author of this blog know! :)
In our family, even chores come with a crypto reward. Papugas for everyone!
- Tags:
- Crypto